This is the Va Temps Home Page
by Dominik Madon
This is the Va Temps Home Page
by Dominik Madon
Warning: This document is not finished, yet. In this early form, one can however get some directions to start working with Va Temps.
Download the latest prc from Sourceforge ( browse all available packages and release) and use your synchronization tool to put it on your palm. Any model having PalmOS 3.5 or greater are supported.
The stable Va Temps releases are available in two UI languages: english and french. The latest english version is named vatemps-en-X.Y.Z.prc whereas the french is named vatemps-fr-X.Y.Z.prc.
The latest stable release is the version 1.4.4.
You can also also install the latest development snapshot which comes in a zipfile with a README.snapshot file listing all the changes includes since the latest stable release.
The goal of Va Temps is to allow you to quickly start and stop activity counters which we call here time traces or time records. Let's take a look at the main view of Va Temps of typical session.
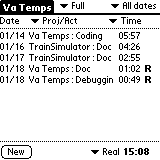
Figure 1
The left screenshot (figure 1) displays the main view of Va Temps. It contains all the tasks of current week (as selected with the top right trigger which can select the date range of the time records to display). Two tasks are currently running, you can see it because of the R letters trailing after the time value at right. The sum of all displayed tasks can be read at the bottom right which sums to 15 hours and 08 minutes. Both tasks have been started on January 18th. The three other activites have been done between the 14th and the 17th.
The top center trigger is set to full which means no filtering is actually done on entries. One can choose to see only Coding activites for instance, or belonging to a specific project.
The new button at the bottom left allows the user to create a new time entry. Note that a contextual menu is displayed when taping on a record description or date. Through this menu (see also the Start, stop, and duplicate a time record), the user may edit, duplicate or delete a time trace.
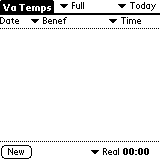
Figure 2
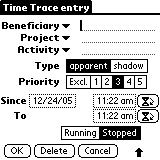
Figure 3
When starting Va Temps for the first time, an empty main view appears like the one at figure 2. No previous activities have been saved so you can't start a new task you have already work on.
To start a new task, the New button on the main view open a detail view of a brand new time entry. The user must then set the values of the time record as its beneficiary, its project name, the activity, and so on. The records menu in the main view has also a new entry that performs the same action.
The example at left on the figure 2 shows what looks like a new time record before the user fills the various fields. The tasks' beneficiary is the one who will gets a benefic of the project (you, your boss, a customer, a friend, etc.), the project is the name of the global activity of which this task is taking part of, and the activity is a more detailed description of the task.
The type selector sets the task "layer". This particular feature allows to grap time passed on tasks that are usually masked and lost (not interesting for billing but interesting for statistical purpose for instance). Reading a manual when writting a program, for example, can lead to one activity: coding, or can fold in two activities: coding and reading a manual. If this work is done for your boss the first information is relevent for him but if you, personnaly, want to know what time you spent reading a manual as a part of your coding activity you will be also interested in the second. To allow tracking of both amount of time the "shadow" selector will flag activites that may be hidden when filtering allowing you to switch between the "apparant" total amount to "real" values.
The task's start time can be set manually (after you have finished an activity) or automatically as soon as you open the detail view in the same time you start your work. In this case, taping in the running selector sets the task as running which leads set the start time. The stop time can be set manually or automatically taping the stopped selector.
When running, the common way to count time passed on a task is to tap the running selector in the detail view, giving task's attributes (beneficiary, project, and activity information) and stop it by taping on the time followed by an R in the main view (third column) of the tasks' entry. The "R" letter appearing at the right of the task entry in the main view tells that the task is running (as in the figure 1).
The priority sets the amount of time given to a task when running concurrently with others. Two tasks having the same priority level will be given the same amount of passed time (divided by two). However, if the priority level is 2 for the first task and 3 for the second, 2/3 of the time will be given for the first and 1/3 for the second. If the priority is set to excl., the latest started task will get all the time and all the other running task nothing until the first one is stopped.
Basically, a priority difference of 1 means one task is twice important as the other leading to a 2/3, 1/3 ratios. A priority difference of 2 means that one task is three times more important than the other leading to 3/4 and 1/4 ratios.
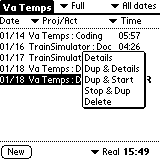
Figure 4
The main view contains all the time records corresponding to the current filter and date range. From this view one can start and stop the tasks, duplicate them, delete them or get to the detail view of one of them.
Start a task: If you are going to work on a task that was already in your main view (for instance Dominik/Va Temps/Coding), you just need to tap on the time displayed at right. A new line is copied at the bottom of the list with the counter running (the R appears at the right of the time amount). If the task you are working on is not displayed in the list, you need to tap the new button or select the new entry in the records menu to create a new task in the detail view.
Note that you can also start a new task based on the attributes of an existing and displayed one and modify the attributes therafter (for instance change the activity from coding to debugging). In that case, tape the task description field (this yields to display the contextual menu) and select start and dup. You will get the detail view of the duplicated task allowing you to make the appropriate changes and mark the task as running.
Stop a running task: Tap on the time (at the left of the R) of the task you want to stop. The R letter vanishes as the task counter is stopped.
Got to the detail view of a task: Press your pen half a second on a record description, when removing your pen you will be redirected to the detail view. You can also tap the task's description once and select detail in the contextual menu.
Delete a task: Use the contextual menu by taping on the description field of the task you want to delete. Then, tap delete to erase the time record. You can also get to the detail view of the task and press the delete button at the bottom (figure 3).
To be completed.
To be completed.
To be completed.
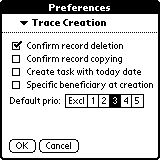
Figure 5
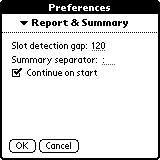
Figure 6
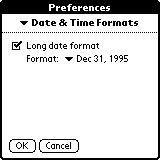
Figure 7
The preferences are split in three panes accessible through the top trigger. The first pane allows the user to choose behavior of brand new created tasks, as for instance, its priority. The second pane contains options related to the report view or the summary view. The third pane contains option about date format. It allows to switch between the short date string to the long date string and choose which format to use in the later case.
The main view has many shortcuts, more than the other forms. Their main goal is to offer quick commands for the user. As stated above, Va Temps has been designed with speed of use in mind.
In all forms, the ok button can be simulated using the return stroke.
Main view shortcuts
NB: the shortcuts given by the menus are not given here since they can be found in the menus them selves.
When a word is written in italic it represents the stroke alone.
| Shortcut | Description |
|---|---|
| t | Change date range to today |
| w | Change date range to current week |
| m | Change date range to current month |
| 7 | Change date range to last 7 days |
| l | Change date range to last 30 days |
| backspace | backward: Previous time range. If, for instance, you have selected the current week, the backspace will move the date range to previous week |
| space | Forward: Next time range (see above) |
| i | Switch between full and partial view. The resulting partial view depends of the selected filter |
Beneficiary/activity/project views shortcuts
| Shortcut | Description |
|---|---|
| backspace | Return to main view |
| alphanumeric | Scroll to show the first item beginning by the typed character. |
Time selection panel shortcuts
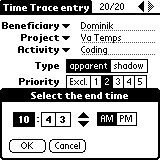
Figure 8
In the time selectors, the following shortcuts provides an easy way to navigate among fields.
| Shortcut | Description |
|---|---|
| space | Move to right field |
| backspace | Move to left field |
| enter | Equivalent to the ok button |
| a | Equivalent to the AM button |
| p | Equivalent to the PM button |
| 0..9 | Insert the equivalent characters in the current selected field and move right if relevent |
Note that on 24 hour time format (set in the Palm system preferences), the AM/PM buttons don't appear.
Menu view
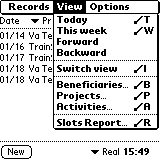
Figure 9
The menu offers also commands to move around. The first four entries of the View menu can bring the date range to today or to the current week as the top right popup trigger does.
The Switch view turn on and off the filter.
The three entries below popup the corresponding forms to view, rename, and delete beneficiaries, projects, or activities.
The last command, slots report, produce a list of slots of the working hours (i.e. the start and stop time of your work based on current filter and date range).
![]()
Latest modifications: 2006-01-19/Dominik Madon